Mural Toolkit

Please download the pdf version here. The pdf version includes examples of murals as well as all of the specifications used to create. We have also created several documents such as creative briefs and artist contracts that you may find useful to get you started on your mural journey. Whether you are an artist starting to create your works on a larger scale, or someone who would like to commission work, but just need a little help getting started, this guide is for you.
Introduction
So you’re interested in having a mural created
Congratulations! This toolkit will walk you through the process from design and commissioning artists, installation, to maintenance and decommissioning of your public art piece.
This document is the result of a partnership between Creative Pictou County and DEANS (Destination Eastern and Northumberland Shores Tourism Association). Please let us know what you think, and if there is any way we can improve the document by emailing connect@creativepictoucounty.com.
Please download the pdf version here. The pdf version includes examples of murals as well as all of the specifications used to create. We have also created several documents such as creative briefs and artist contracts that you may find useful to get you started on your mural journey.
Why a Mural?
Murals play a key role in the beautification of an area as well as and have many beneficial social and economic impacts:
- Murals create a destination environment that draws businesses and customers to an area, and therefore boost the local economy
- Murals encourage walking traffic and street life that encourage visiting local businesses and lower crime and anti-social behaviour
- Murals give a community a sense of uniqueness and culture. They make a community proud and give it a sense of identity!
- Almost anyone can be involved in mural making, including local artists, businesses, and community groups
- Murals are an accessible way to include public art in your community
Mural Design
What Kind of Mural Will Work for Your Community?
- Murals should have a memorable design with a clear message that bolsters community values
- Be creative and unique
- Relevant to the community in which it’s situated
- Respectful of the site and local features
- Well prepared and cared for; Maintenance is important for the community to take pride in the work
What kind of challenges can you expect?
- Commissioning an artist who can achieve the mural quality and vision within budget
- Finding the right site (location, surface quality, permissions)
- Time delays due to working outside in the elements
- Securing funding for the project
- Maintaining and decommissioning the mural
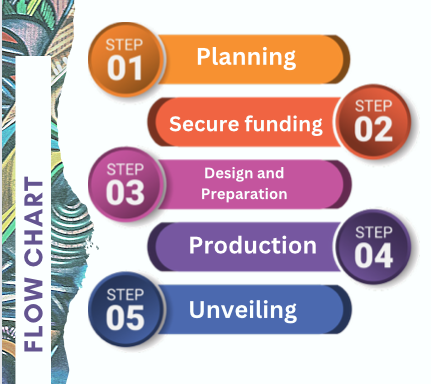
Planning
Things to Consider:
- What is the overall idea for your mural?
- How does a mural achieve your goals for the community, local businesses, and municipality?
- Where will the mural be located? What permissions are needed, is the space accessible for the muralists?
- Who will oversee the project? A team, or an individual?
- How will the mural be maintained?
- How will the mural be decommissioned when the time comes?
- How much is my mural going to cost?
Community Engagement
- A mural project is a great opportunity for community building
- Who lives in the community and how can their stories be shared?
- How have these groups experienced common events (eg Fiona).
Pricing
- Artist experience
- Apprentice
- Professional
- Per square foot
- Standard or base line
Expenses to consider:
- Materials
- Scaffolding
- Installation
- Artist fees
- Design fee
- Travel expenses
- Overhead
- Insurance, workers compensation
- Liability Insurance if required, are you certified, is it up to date
Payment Process
- Estimate and downpayment
- Track actuals
- Do a check in during the project
- Negotiate final prices
- Check in if there are large unexpected costs/adjustments
Secure Funding
Funding Opportunities
There are federal and provincial grants available to municipalities, non-profits and artists:
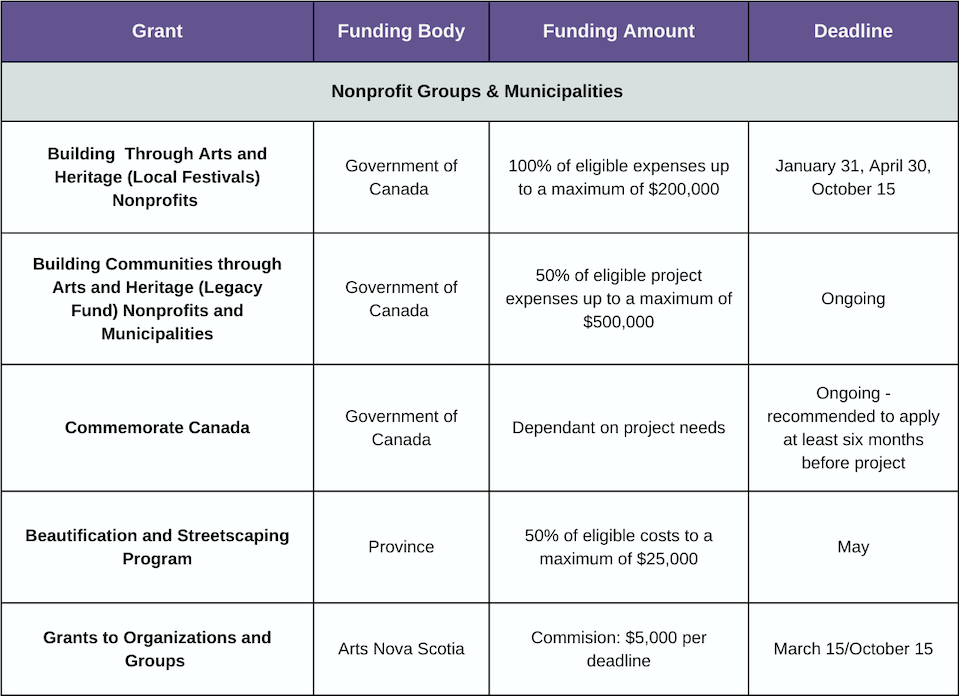
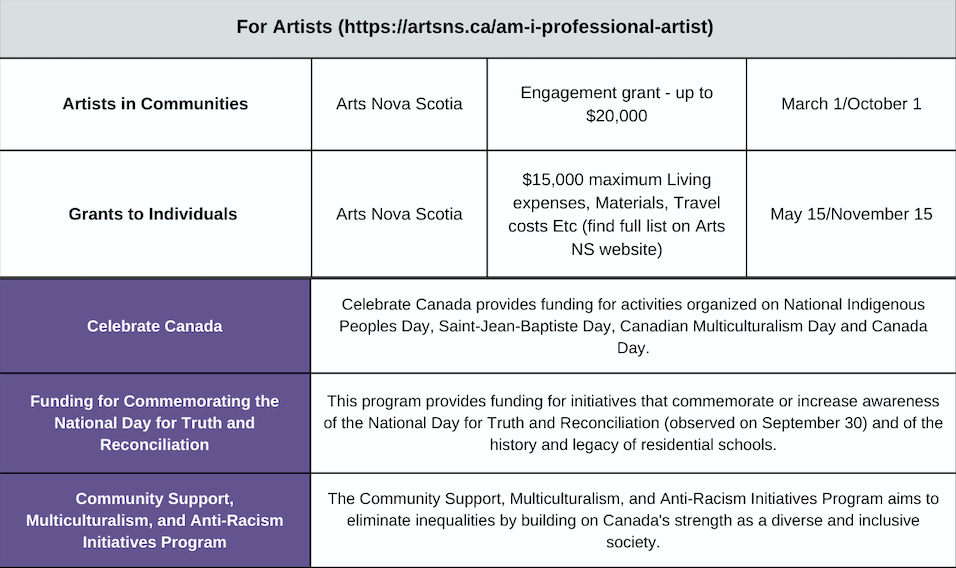
Please visit creativepictoucounty.com for up-to-date funding opportunities.
Design & Preparation
Design, Preparation and Mural Creation and Completion
Initial Consultation
- Discuss vision for mural and location possibilities.
- Determine how to proceed: sketches, payment process, timelines etc.
- Refer to Creative Brief Template for details
Create Sketches of Mural
- Clarify which wall is to be painted and concept details for mural
- Establish fee for artist to provide sketches
- If the sketches are approved, the fee can be deducted from the overall cost of the mural. If not, the artist retains the sketch fee.
Mural Timeline
- The artist provides a project timeline, sourcing supplies, scaffolding/set up, and take down.
Artist Fee/Contract
- Negotiate artist fees and payment terms, for example a percentage up front, payment midway and balance on completion.
- Draw up and sign a contract.
- Refer to Artist Commission Contract Template
Multimedia Considerations
Murals can easily be enhanced by adding multimedia including sound, lighting, and projection:
- Incorporate lighting, solar
- Incorporate the environment in the design with natural elements; eg, air currents, sun rotation
- Sound, music
- Projection
- Tactile, touch, braille
- Interactive, rotators, levers
- Mirrors
- Phone to video
- Accessibility
- Inclusivity
Producing the Mural
Production
After completion of the artist brief, and the contract,
the artist will begin to gather materials and supplies. While doing this remember to do a site safety inspection, ensure there is proper fall protection certification, and if there will be use of motorized lifts or scaffold installation. The artist will have to consider methods for scaling up their artwork, and also consider the surface that they will be working on. Finally site clean up is a very important part of the plan. All materials need to be removed from the site, and proper disposal of any industrial or toxic items needs to be looked after.
After materials are gathered and safety is ensured, the surface can be prepared and production of the mural will begin. Alternatively, if the surface is too difficult to work on, or if it’s an off season mural (Maritime winters are very unpredictable to produce quality work in!) panels can be painted off site and installed. Finally, the mural is sealed with a protective coating, and site clean up can begin.
From NovaScotia.ca | Workplace Safety
Safety Hotline: 1-800-9LABOUR (1-800-952-2687)
Workplace fall prevention tips
Falls from heights are a leading cause of workplace injuries in Nova Scotia. They can happen in a split-second and can result in serious injury or death. Any person working at heights over three metres is required by law to be trained in fall protection systems. This includes work on ladders, scaffolding, elevated work platforms, roofs or any other place that presents a fall hazard.
To avoid the risk of injury when working at heights:
-
Take precautions when a work area has a fall distance greater than three meters (10 feet)
-
Ensure employee safety training is valid, and the training cards are available on worksites
-
Ensure fall protection equipment is right for the task, fits properly and is in good condition
-
Confirm a fall protection safe-work procedure and plan are in place when fall distance is greater than 7.5 metres (25 feet)
Safety
Different locations require safety considerations, here are some common ones:
- Scaffolding, when is it required and are harnesses necessary
- Are permits required
- Does the road need to be blocked off
- What are the regulations on site
- Site safety protocols
Ensure all safety protocols are communicated
Unveiling Event
Promotional Strategy and Unveiling Event
While the unveiling event comes at the end of the work, it’s important to begin preparations for it at the very beginning of your project. Everything you do to make your mural a reality will influence how the unveiling event looks, and can help promote the project throughout. In fact, if the proper design and community engagement are done, the promotional strategy and unveiling event will practically write themselves.
Information for the Program
The program is a digest of the entire project and should include information taken from every document used in the process.
In-Progress Images
Collect in-progress photographs, label, and store them so that they’re ready to access when the time comes. Beyond the work itself, pictures of the artists involved, tools and materials, and even surveying and safety preparations can be of interest. A robust social media strategy will be releasing a selection of these photos as the project progresses, and these and all the rest should be available to the project manager at any time.
Design Documents
The principles of design for your mural will be of interest to the communities that will be viewing it in their day-to-day activities. Keep the documents where these principles are expressed ready.
Information Gained from Community Engagement
Let the communities you are serving know that their opinions matter! Include the results of your community engagement and how these results led to the final mural.
Bios of Stakeholders
Collect the bios of your artists and other stakeholders. Other work samples, write-ups, and reviews will help the public to become excited about the new art piece appearing in their neighbourhood.
Inviting Public Personalities
A selection of local political representatives, community members, and people who worked on the project should be at the unveiling event to say a few words and be able to answer any questions that arise.
Inviting the Press
Reach out to the local press to ensure news of the new mural spreads far and wide. Ideally, the press will be notified at the beginning and end of the project.
Setting Up The Event
A memorable event will have the right staging and services;
- Chairs and Accessibility Seating If your event is outside, the weather can influence the attendees enjoyment of it, and hence their disposition towards the entire project
- Stage A raised platform elevates the event
- Sound Equipment Make sure everyone can hear you with the right sound equipment. A sign-language interpreter could also be present.
- Lighting Equipment Depending on the time of day, lights may be required to show off the project and the speakers at your event.
- Catering What’s an art opening without catering?
PROMOTE, PROMOTE, PROMOTE
Share the event far and wide! The more people are present at the unveiling, the better!!
Artist Considerations
Artists with a background in painting will find it easier to produce murals, but the work still comes with its own particular challenges. Doing some research into common wall types in your community will help you address problems before they arise.
The surface you’re working on
Unlike paper or canvas, walls will rarely present an ideal working surface. Be sure to familiarize yourself with the kind of surface you’ll be painting on, and the condition it’s in. What is the surface made of, and what kinds of paint are best suited to it? Is the wall interior or exterior? How large is it? Are there any obstructions? Know your surface, and plan accordingly!
Rough or smooth?
The more textured a wall, the more challenging to paint it. Rough brick and textured stucco will make it hard to transfer a design to the wall, use more paint to fully coat, and will cause more wear and tear on your brushes. There is the option to use some filling compound to even out the wall during the preparation stage, but this may be a more permanent solution than the client desires.
Size of the Wall
The size of your surface will influence every aspect of your mural, from the way the piece is viewed, to the safety equipment required to produce the work, to the appropriate method for scaling up a design drawing. Note, any work performed over 3 meters requires fall protection training and equipment, so this is the threshold over which a small project becomes a large one.
Obstructions
Few walls were designed with murals in mind, so there will often be obstructions to the work, such as vents, service inlets, windows, and irregular architectural details. If the wall is chosen before the design process begins, consider creatively incorporating these obstructions in your mural.
Steps to preparing the surface
Only some of these steps may apply to your project, but here are a few things you may need to do to prepare your wall for painting:
- Strip old or damaged paint
- Repair damaged portions
- Clean the wall. Exterior walls may be water blasted, interior walls may need degreaser to lift fingerprints and smudges
- Make sure the wall is completely dry before applying paint; nothing sticks to water!
- Use interior or exterior primer as appropriate
What paint to use?
For interior walls, the choice of paint is up to the artist, but interior water-based acrylic paint is recommended. Highly water soluble paint, such as tempera, should be sealed with a spray sealer to preserve.
For exterior walls, exterior acrylic paint is recommended, and requires no sealant. You may chose to seal anyways to extend the life of the work, and anti-graffiti coatings exist to repel unwanted markings on your mural.
Scaling up a Design Drawing
There are two commonly used methods of scaling up a design drawing, each with their own strengths and weaknesses:
Grid Method: A grid is overlaid on the design drawing, and a larger grid drawn on the wall. Using the grids as reference, details of the design are transferred to the wall.
Strengths: Works in any lighting conditions, minimal technical requirements
Weaknesses: Not the most accurate results, grid must be removed
Projector Method: The design is projected on the wall, commonly by an overhead projector, then traced.
Strengths: High degree of accuracy, straight forward process
Weaknesses: Low light required to see projected image, projector required
Of course, a design can also be transferred freehand to the wall, but the confidence to do this may not be available to all artists.
Working Outside
Anyone who works outside is engaged in a constant battle with the elements. Whether it’s too hot, too cold, raining, snowing, or windy, you must keep a watchful eye on the weather and behave accordingly.
- Hot, sunny day: Sunscreen, shade, and hydration are key.
- Cold day: Paint takes longer to dry in the cold, but is otherwise unaffected. Warm clothing, gloves, and a warming station are recommended.
- Wind: Can be incredibly dangerous, and interfere with the application of paint. Scaffolding must be anchored appropriately, as well as any smaller items that could blow away.
- Rain: Give up. Sometimes work must be postponed to another day. Be sure your wall is dry before restarting.
- The public: While working outside presents many opportunities to engage with and expand your audience, the public can present safety hazards for you or themselves, especially where overhead work is being performed. Restrict foot and vehicle traffic where necessary, and seek help from cities and towns if major closures are required.
Another Way
If the challenges of putting paint to wall are too many, consider producing your mural offsite; paint your mural on individual panels, then install them when complete.
Strengths: Less time spent in a high-hazard environment, fewer concerns about public safety, the weather, the wall surface.
Weaknesses: Additional facility required, installing panels require engineered mounts to maintain a safe piece of public art.
“Car Culture Mural” Los Angeles Artist Janet Wallace
Materials and Surface: Acrylic on stucco wall
Time to design: One month
- Grant writing
- Discussing Theme
- Finalizing Theme
- Concept Development
- Scaling To Size
- Sourcing and Installing Scaffolding
- Purchasing paints, drop sheets, brushes and all related materials for creating the mural.
Photo by Jaunt and Joy on Unsplash
Download the pdf version of this article here.